Future-proof Your Digital Training Logs with Markdown

Andrew O

Table of Contents
Introduction
Let me ask you this question: how confident are you that the app you are currently using to track your training progress will still be around in 10 years? Or even 5 years?
I think the answer is obvious: you can’t be sure. Apps come and go, and with them, your data. Some will allow you to export it, but in a format that is not very useful. Others will simply shut down, and you might lose everything. This is a problem that I personally faced more than once, and today I want to share with you the solution I found, as well as the reasons why I think it is the best one.
But first, let me make a note: this applies to the digital training logs. If you are using a good old paper notebook, you are already future-proofed. Congratulations!
For the rest of us, let’s dive in.
Plain text
Think about plaintext as the lowest common denominator of digital formats. The reason you would choose it is that it simply a file with text. You can use it on any device, and there is a plethora of apps that support it. Even if the app you are using now goes away, you can still read and edit the files, for example .txt can be opened in any text editor.
Why would you choose it over a fancy app with pretty interface, graphs and other features?
The answer is independence - instead of becoming dependent on an app, adopt a plain text format that gives you flexibility to use it anywhere. Besides txt, there are other formats that offer more features like headers, lists, and links.
Let me introduce you to Markdown.
Markdown
if you are already familiar with Markdown, you can skip this section.
Out of available plaintext formats, I recommend Markdown. It is lightweight, easy to learn and use, and offers a lot of features that make it a good choice for training logs. It was designed to be easy to write and read, which is important for a training log that you will be using often. Markdown files are saved with .md extension, for example Training.md.
Next, we need to introduce the concept of rendering. When you open a markdown file in a markdown editor, it will render the file, meaning that it will show the formatted text, not the markdown syntax (e.g. “#” will disappear and render headers, “-” will become a bullet point, etc.).
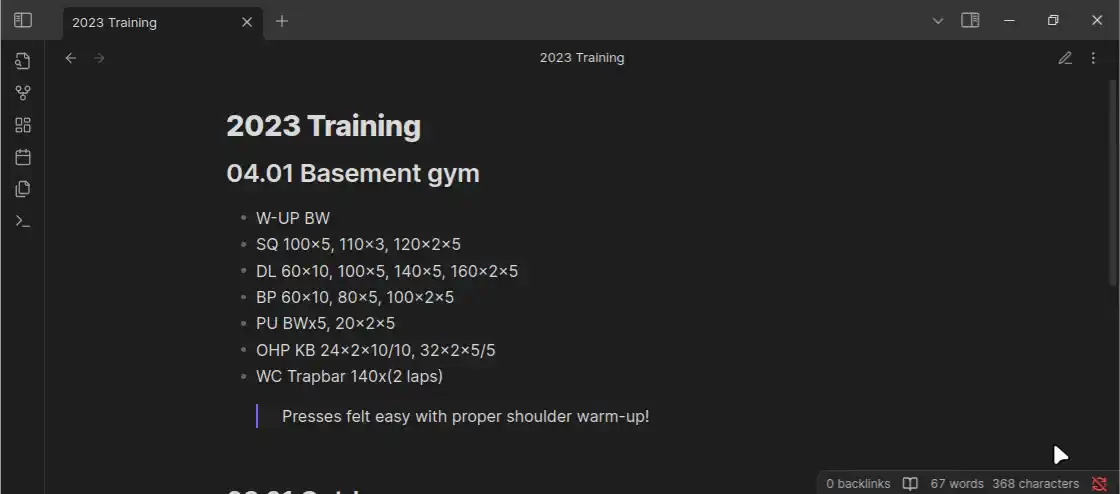
Markdown editing/viewing demo - click to enlarge
In the demo above, you can see me switching between “edit” and “preview” modes in Obsidian.
You can try out Markdown with some online editor, for example markdown live preview, or 4markdown. Works on mobile just as well, for example markdown editor.
Markdown editors
There are plenty editors available, and I encourage you to try a few to see which one you like the most. They are usually free, so you can check them out without any risk.
Here are some that I recommend:
- Obsidian - the one that I use personally, also for note-taking beyond training logs. Reasons I use it: good sync between devices, good interface, and a lot of plugins. I use both on mobile and desktop.
- Typewriter - a simple and clean editor, available on mobile and desktop.
- Typora - a popular choice, with a good interface and a lot of features.
- Bear - a good choice for Apple users, with a clean interface and good sync.
- NeoVim - for the more advanced users, a powerful text editor that can be used for Markdown as well. My second choice after Obsidian, for desktop use.
Whatever editor you choose, the main advantage of using plaintext format is that if you decide to switch, or if the app you are using goes away, you simply take the file and open it in another app.
When, for example, Obsidian is no longer maintained or gets replaced by something better, I can simply take my files and open them in another app that supports Markdown — this is the beauty of plain text.
Sync and backup
The second component to making a truly future-proof log is to sync and backup the files, so that you don’t lose them in the long term.
This doesn’t have to be complicated. If your app of choice supports sync between devices, you are good to go. If it doesn’t, you can use some cloud service, and place the markdown files into a folder that is shared and synced between devices. This also allows you to use different editors on different devices, and still have the same files with the same markdown syntax.
I personally use Obsidian Sync for this, as I mostly write and edit on logs on my phone, and then analyze them on the computer.
Log format
Next, let’s talk about how to structure the training log. This is a personal choice, and what I provide below is a tried and tested system that I developed over the years. You can borrow some of the techniques and ideas, and adapt them to your needs.
Structure
Usually I think about training periods in terms of seasons (e.g., winter season with more steel, summer season with more activities, spring/autumn - transition periods), and seasons make up a year - so I have one file per year (e.g. 2025 Training.md). This way, it is easy to go back to a certain training block and analyze it.
Within that file, I structure the log by date (as a heading), with an optional location or workout name. Then I list the exercises/activities, with weight, reps, and sets.
The dates within the file go in reverse order, so that the most recent training session is always at the top. This way, you don’t have to scroll down to enter the new data. When analysing the log, you will go from bottom to the top.
Weight, reps, and sets
There are many ways to log the weight, reps, and sets, and I don’t want to trigger a debate on what is the best one, particularly about where to place the reps and sets. The one that I use involves the following structure:
Exercise: weight x sets x reps, for exampleSQ: 100x3x5. This is 3 sets of 5 reps with 100kg in the Squat.- The sets number can also be skipped if only one set at given weight was done, for example
DL: 150x5. This is one set of 5 reps with 150kg in the Deadlift. - When doing unilateral exercises, the log is extended to include both sides, for example
OHP KB: 24x2x5/5, number to the left from/is the left side, and to the right is the right side. This is two sets of 5 reps with 24kg in the Kettlebell Overhead Press, for both sides. - For bodyweight exercises, I use
BWinstead of weight, for examplePU: BWx10x5. This is 10 sets of 5 reps of Pull-ups with bodyweight. - For several working sets during one exercise, they are separated with a comma. For example, a set of squats at 100kg followed by a set at 110kg:
SQ: 100x5, 110x3.
Shortcuts
You might point out that writing a full length of the exercise name into a text file during the training session might be a bit cumbersome. I agree and see two ways to deal with this:
- Prepare the list in advance
- Use shortcuts
The first option works when you are training within a highly structured program. Still, sometimes you might want to add an exercise on the fly. For example, the accessory work that you do at the end of the session.
In order to tackle this, I’m using a system of shortcuts. They are defined in a separate file with the list of shortcuts, so that I can decipher them later even if I forget what they mean. Some of them might be familiar, and some not - I borrowed a few from the books and articles, and some I developed myself. For example, you would likely already know “RDL” for Romanian Deadlifts, or “GHD” for Glute-Ham Raise.
Extending on this, “DL” stands for “Deadlift”, while “SDL” stands for “Sumo Deadlift”, “JDL” for “Jefferson Deadlift”, and so on.
For some exercises, a shortcut offers ridiculous time savings - good example is “Chuck Sipes Gooseneck Wrist Curls” which I shorten to “GCurl”. I do this exercise consistently, and just this one shortcut saves me a lot of time. Shout out to APS1 for introducing me to this exercise in his book.
I encourage you to develop your own system of shortcuts, this way it will also be easier to remember and use.
See below for the list of shortcuts that I use often:
My Commonly Used Shortcuts (click to expand)
SQ- SquatZSQ- Zercher SquatFSQ- Front SquatBSQ- Back SquatGSQ- Goblet SquatHSQ- Hunter Squat
DL- DeadliftSDL- Sumo DeadliftJDL- Jefferson DeadliftRDL- Romanian DeadliftZDL- Zercher Deadlift
BP- Bench PressOHP- Overhead PressHKP- Half-kneeling Press
PU- Pull-upsPS- Push-upsDPS- Diamond Push-upsTGU- Turkish GetupBCurl- Bicep CurlGCurl- Gooseneck Wrist CurlBRC- Brachialis CurlHCurl- Hammer Curl
CP- Clean and PressLC- Long CycleWC- Weighted CarryW-UP- Warm-up
Some exercises are not shortcutted, for example I write Row, Dips, Swing, Snatch and Clean often in full, simply because they are already short.
Training implements
Sometimes it is useful to note which training implement you used for the exercise. Some exercises like OHP or TGU can be done with a kettlebell, dumbbell, or barbell.
Here the system is simple:
KB- KettlebellDB- DumbbellBB- BarbellBW- Bodyweight
For example, a Barbell Overhead Press, 70kg for 2 sets of 5: OHP BB: 70x2x5.
Pull-ups bodyweight: PU BWx15 or weighted: PU 15x5
Comments
One of the best moments about analyzing your training logs is to see a comment that you wrote a long time ago, and remember the context. It can be just a note about how a certain exercise felt, or a summary of the training block. Raw numbers already tell a good story that you can analyze now and in the future, but comments add a lot of context and your understanding of the training progress at that moment in time.
I use “>”, which is the Markdown syntax for blockquotes, to add comments. This way, they are visually separated from the rest of the log, and easy to spot.
For example:
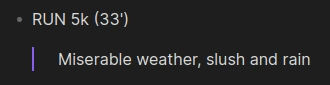 Here I give context about the weather and how it affected my training session.
Indicating PRs and failed lifts
Nothing beats finishing a PR and putting it in the books. But what about failed lifts?
I think logging a failed attempt is as important as logging a PR. This way, the log is more complete and provides a better picture of your training progress.
For PRs, the way to log it is simple: add (PR) after the weight, reps, and sets. In the example below, you can see that a PR in the squat was hit:

For failed lifts, I use a dot .. The dot can replace or extend the rep number. In the screenshot above, you can see that last set of deadlifts was a failed attempt, logged as:
DL: 180x.
Another example for multiple attempts: three failed attempts in the squat at 100kg would be written as:
SQ: 100x3x.
The dot can be appended to indicate a set to failure. For example, a set of squats until failure at 100kg(10 reps, 11th failed):
SQ: 100x10.
Cardio and aerobic activities
I also log cardio and aerobic activities, like running, hiking, cycling, or swimming in the same log - it is all training after all. Here, the structure is similar, the main difference being that instead of reps, usually the distance or time is logged.
Logging the distance is straightforward, for example, a 5km run:
RUN: 5km
Logging the time is done using ' for minutes and " for seconds. For example, extending the previous example to include the time:
RUN: 5km (25'30")
Same system is used to log intervals, for example 5x400m run with 1 minute rest between:
RUN: 400m x5 (1' rest)
Effort level
Effort level indicates how hard a given set or interval was, and is useful for both lifting and cardio activities.
For lifting, commonly used system is RPE (Rate of Perceived Exertion), which goes from 1 to 10, with 1 being very easy and 10 being maximum effort.
When logging a lift, add RPE at the end, for example a set of squats at 100kg with RPE 6:
SQ: 100x5 RPE6.
For cardio and aerobic activities, I use a percentage system, where 100% is the maximum effort. For example, a set of hill sprints at 90% effort:
HILL SPRINT x10 90%.
Supersets, complexes and circuit training
For supersets, circuits, or complexes we can utilize indentation to show that exercises are done together. On a higher level, indicate what kind of training it is, and list individual exercises as subpoints. Rest periods or other info also indicated on top level.
Shortcuts for types of circuits/supersets:
SS- SupersetC- CircuitSC- Slow CircuitCX- Complex
For example, 5 supersets of Pull-ups and Push-ups:
- SS x5
  - PU: BWx10
  - PS: BWx10
Slow circuit of kettlebell Swings, Goblet Squats, and Push-ups, 3 rounds:
- SC x3
  - Swings KB: 24x10
  - GSQ: 24x10
  - PS: BWx10
Circuit training of bodyweight Pull-ups, Push-ups, and Squats with 1 minute rest, 5 rounds:
- C x5 (1' rest)
  - PU: BWx5
  - PS: BWx15
  - SQ: BWx10
Examples
Let’s take one or two examples to see how the log looks in practice.
Example 1
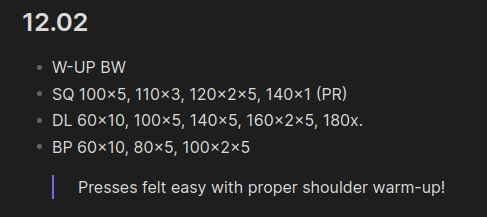
- In this example, workout takes place on 12th of February, and it starts with a bodyweight warm-up.
- The first exercise is the squat, with 100kg for 5 reps, then 110kg for 3 reps, and finally 120kg for two sets of five. At the end, a PR is hit with a single at 140kg.
- Second exercise is the deadlift, with warm-up sets at 60kg for 10, then 100kg for 5, and finally 140kg a set of 5. The working sets are 160kg for two sets of five. Then there is a failed attempt at 180kg.
- Third exercise is the bench press, with 60kg for 10, 80kg for 5, and 100kg for two sets of five.
- There is also a comment about proper warm-up for the bench press.
Example 2
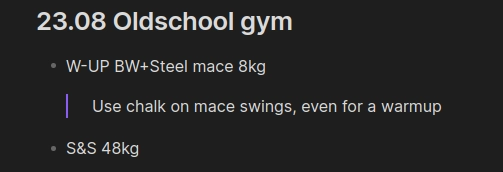
- In this example, workout takes place on 23rd of August in the Oldschool gym, and the warm-up consists of bodyweight exercises plus steel mace exercises at 8kg. Since this is a general warm-up, reps and sets are not logged.
- There is a reminder to use the chalk even on warm-up sets for mace swings.
- The only entry for the main part is
S&S, which stands for “Simple and Sinister” kettlebell program2. The weight is logged at 48kg, which means all exercises within the program are done with this weight: Goblet Squat, Turkish Getup, and Swings. TheS&S, or other program, should be described elsewhere in the notes or referred to explicitly, so that you know what it means later on.
Conclusion
I hope that after reading this article, you will consider making a choice towards a more future-proof and flexible way of logging your training progress, and borrow some of the ideas and techniques that I shared here.
Approach provided here will allow you to track your training progress consistently for years to come, be independent of the app, device, operating system, and even the internet connection.
Feel free to leave a comment below, and have outstanding training!
Andrew
Recent Posts

A plug-and-play checklist for an overnight or multi-day hike

Andrew O

A plug-and-play checklist for a day hike, tried and tested
Andrew O

DIY 3D-Printed Mace/Gada for your home gym, filled with concrete and metal filler
Andrew O
Leave a comment
Need help or want to collaborate?
Contact for any inquiries, I'll get back within 24 hours.